My cooking involved my special lasagna recipe...a longtime family fave. I had not cooked it in so long, I was afraid it wouldn't turn out. But it was wonderfully decadent!
I wish I had taken a picture of it...but I will pass along my recipe. It contains some shortcuts, because with a big family I don't have time to simmer sauces all day!
Paula's Lasagna
1 lb ground round
2 large containers of large curd cottage cheese
1 large package of Philadelphia cream cheese
1 large spaghetti sauce, Traditional Prego
1/2 onion diced
1/2 bell pepper diced
1 large container Parmesan cheese
2 medium packets grated Mozzarella Cheese
1 large brick of Mozzarella Cheese, sliced
2 packages of Dream Fields lasagna noodles
Makes 2 pans of lasagna...I use pans approx 11x9 Preheat oven to 350 degrees
1. Put water on to boil in very large pot (for noodles)..
2. While waiting for water to boil, brown ground meat with onions and bell peppers
3. When meat done, pour in Prego sauce and turn off heat
4. In a separate bowl, combine the Parmesan cheese, the cottage cheese, and the Philadelphia cream cheese, stir until completely mixed...some people add Italian seasonings in here also
5. By this time you should be able to add noodles to boiling water, note: you don't have to boil the noodles long, just a few minutes until partially done, noodles should get soft enough to bend down into water, but still too tough to eat right then (they finish cooking in the oven)
6. While noodles are cooking, ladle in a thin layer of sauce into bottom of both pans...
7. Place 3 noodles across bottom of both pans
8. Layer on 1/2 of the cottage cheese mixture into each pan, on top of the noodles
9. Then place another layer of noodles, followed by a covering of the sliced Mozzarella cheese
10. Layer noodles on top of the cheese, then spoon a generous portion of the spaghetti sauce over the entire pan, followed by another layer of noodles...
11. Spoon on remaining sauce and top with shredded Mozzarella cheese
12. Cover with tin foil and bake at 325 or 350 degrees about 45 min to 1 hour.
You can actually layer the items in any manner you wish...Sometimes if your noodles are really cooked to the point of being done, the lasagna will have alot of liquid...but that's ok, just let it sit about 30min and it will firm up some...oh and lasagna is always better the next day!
This will serve about 10 - 12 people, generous portions
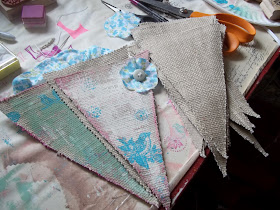
I also completed a banner project....in an earlier post, I showed you painted burlap banner pieces with light blue fabric flowers....
I re-worked the paint and covered up most of the stamping,(the stamping just didnt come out well) And here is the finished project:
Basically, all the materials were up-cycled! The burlap fabric was a scrap from a furniture store display; the ribbon left over from a baby shower project; the paint was so old, I had to thin it with water; the blue flowered material was a shirt I picked up for 2 dollars at a thrift store; and the buttons are vintage, they came from my grandmothers stash!
I cut the burlap pieces, dry brushed them with off-white paint (this took several coats to get a good coverage, because the fabric soaked up the paint), stamped small images using the tourquise blue acrylic paint rather than ink...I then freehand painted on the letters J-O-Y.
I sewed the ruffles on the top witha simple running stitch, and trimmed edges with pinking shears, so the edges would be aligned...the fabric flowers were made by folding and small scrap into a pie shape and cutting the edges off in a rounded shape, when opened up you should roughly have a cirle...then gathering the middle with needle and thread, secure with the buttons for center...oh and I did use a light green fabric circle under the flower as an accent, with a little tourquise ribbon accent as a "leaf".
I was afraid the burlap would ravel too much if I made holes to string the banner onto the ribbon...so I stitched the ribbon across the banner pieces with a simple whip stitch.
I gave the sweet spring-y JOY banner to a young friend that likes to craft also!
I had a lovely visit with my grandchildren also during spring break...check out this picture of my grandson, Tristan...living simply, playing with his uncles boot box! Yes, that is Tristan laying in the box, just a talkin to himself and playing!


you're so fun! i am expecting pictures of lasagna but then you are instead treating us to pictures of a beautiful banner! love it. thank you for linking it up at our party at http://www.finecraftguild.com
ReplyDelete