I have put away my fabric for a while and gone back to crafting with paper. I created two girly girl banners, perfect for a new baby or little girls room.
Sweet and Angel Banners
I made my banners with My Minds Eye products, chipboard letters from Basic Grey and Recollections from Michael's, prisms from Hobby Lobby, vintage buttons, hemp twine, and vintage ribbon.
 Using the Martha Stewart score guide, I scored my 1 1/2 " x 12" paper strip every 1/4th inch. You then fold accordion style on each score line, glue the edges together to create a circle. Actually like a little tube.
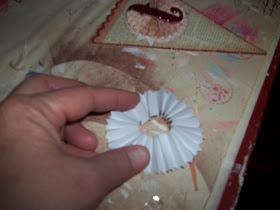
 When this piece is pushed flat, a pinwheel is created. You have to glue it together quickly, or it will pop back up....
 Here is the pinwheel front. I also have a Big Shot Die by Tim Holtz that cuts these out already perforated...the are really cute too, but are rather small...I like make really large pinwheels with 2 paper strips - 2 1/2 in wide, and scoring every 1/2 in, gluing the strips together...and you end up with a pinwheel 5 in across.
 The next steps are basically just layering, and embellishing. I kept these banners pretty simple. The paper products already had some glitter, and for the "Sweet" banner I used a glitter chipboard letter. The color is a brighter pink, and it really pops!
 Here I just punched holes so the pieces could be strung together...I tried just about every ribbon I had in my stash...
 Finally, I went for simple...a plain white hemp cord. I threaded vintage buttons through in between each banner piece. This was not only for the look, but also to keep the banners from sliding around on top of each other.
 On the "Angel" banner, I used a vintage silky cord to string the banner pieces together, and a piece of embroidery floss to string the crystal pieces (the crystal holes were too small for the cord). Also, I used cream chipboard letters, for a softer look.
Below are a few other projects I made...
A Christmas "Peace" banner for my Mom
Joy Banner
Party Decorations
These are the large pinwheels I mentioned earlier in this post. These pinwheels were strung together to make a birthday decoration for my granddaughter, along with the "Happy Birthday" banner made out of coasters below...
I hope you all are having a relaxing weekend also!
xoxo
PK
This project shared here:


I just love these banners Paula especially the pinwheels
ReplyDeleteBettyxxx
Thank you! They are so fun to make!
ReplyDeleteI'm obsessed! Thats about all I can say Paula. I want like every banner you post!
ReplyDeleteThank you!
ReplyDeletelol, I am obsessed to with making banners! There are not enough hours in the day to do everything I want to do, make every banner that comes into my head!
I am also getting a little obsessed with blogging!
Your banners amaze me! I would love to get into making banners. Just wonderful!
ReplyDeleteThanks for linking up to our Sunday Round Up link party. Hope to see you again this weekend :)
xoxo
Heather