
Today, I am going to give a tutorial, using modeling paste,
to create easy home decor pictures.
.jpg)
to create easy home decor pictures.

Supplies
- Modeling Paste
- Plastic Stencil
- Canvas
- Plastic Palette Knives
- Assorted acrylic paints
- Sponge brush
- Spray water bottle
- Rag
For this demonstration, I am using an 8x8 flat canvas board, which will rest on an easel for display. Later in the project you will see an 11x14 regular artist canvas, which is what I usually utilize for this type of project. A flat wooden surface would also do well.
1. Position stencil over canvas, you may secure the stencil with tape.
However, this project is meant to be a little messy, so I usually skip this step!
2. Using Palette knife, scoop small amount of modeling paste,
and gently begin to apply to open stencil areas.
Thickness is personal preference,
I like the central object thicker, and surrounding objects thinner (flatter).

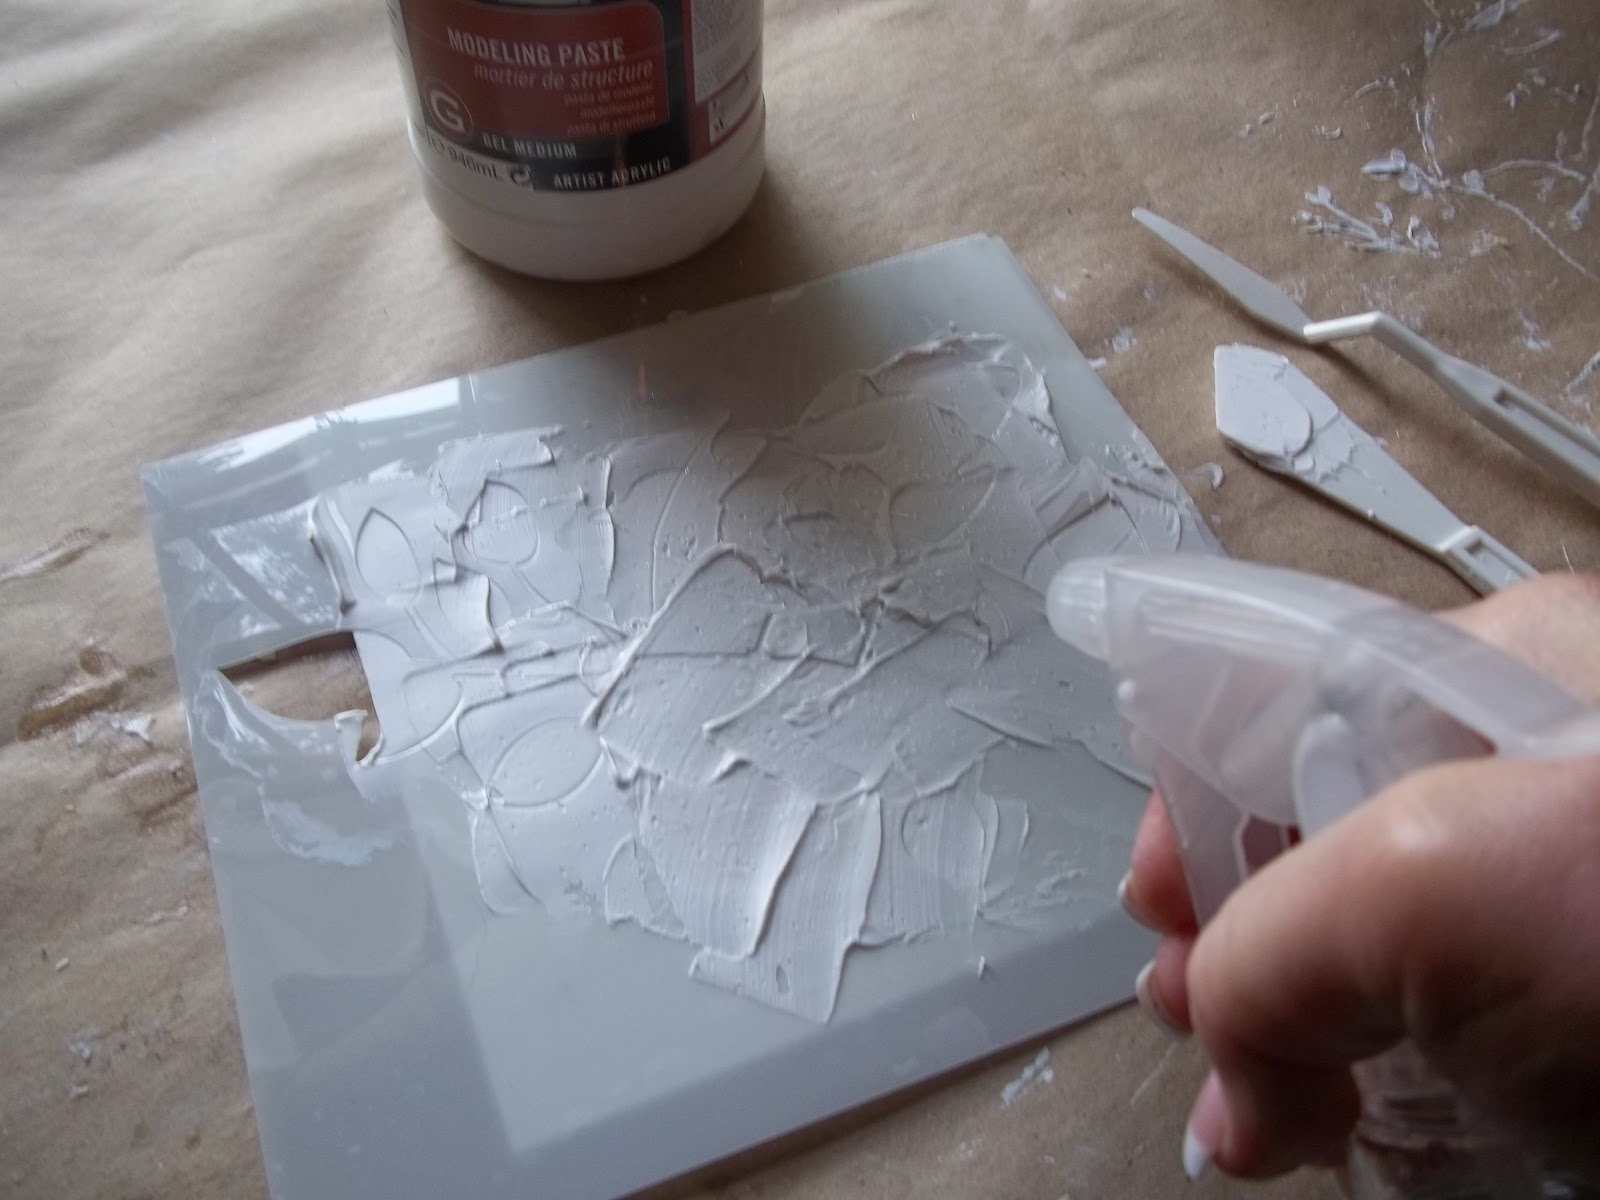
3. Mist lightly with water to keep the modeling paste from becoming too sticky.
You can smooth out the palette knife marks a little here also.

4. Remove the stencil, gently so you don't tear the stencil.
Don't worry about making a mess or smears...

Here is what you have when stencil is removed.
Basically, there is no right or wrong way to do this project...the next step could easily be done BEFORE putting the stencil on...

5. Gently, scrape the excess modeling paste off the stencil and apply it around the edges of the canvas, as above.
You can see here that some of the canvas texture shows, which is fine with me...however, if you don't like that look, you can "prepare" the canvas before stenciling...simply apply a thin layer of modeling paste to the entine canvas, let it dry, then apply stencil and modeling paste for design.
6. Let entire canvas dry...then you are ready to paint!

I chose a "Buttermilk" white, brown, and dark yellow as my color scheme. I also mixed in a little "Glazing" medium...purely optional. The glaze medium makes it a little easier to blend the colors, and gives the colors a transparent quality.
7. I painted the entire canvas the "Buttermilk" white, then begin layering on the other colors for shading and defining depth.


I used several techniques to layer on the paint...sponge brush and my "paint rag"
Ta-Da! Here is the finished project!

Lol, the picture looks kattywonkis because of my poor picture taking skills!
Also, it appears darker in this picture than it really is...
The entire project only took about 2 hours...and most of that is drying time!
Happy Summer Crafting!
xoxo
PK
Shared on these wonderful parties:
TitiCrafty by Camila
Sew Can Do
Scattered Thoughts of a Crafty Mom
Sugar Bee Crafts
A Creative Princess
Isabelle Thornton Le Chateau de Fleurs
Live Laugh Rowe
I Gotta Create
Shared on these wonderful parties:
TitiCrafty by Camila
Sew Can Do
Scattered Thoughts of a Crafty Mom
Sugar Bee Crafts
A Creative Princess
Isabelle Thornton Le Chateau de Fleurs
Live Laugh Rowe
I Gotta Create
Terrific tutorial. And I love the finished art. Great!
ReplyDeletewow. wow. and wow. that look amazing! like something that one of the big name stores would charge lots of money for! thanks so much for linking up to tip-toe thru tuesday!
ReplyDeleteI really like this!
ReplyDeleteThis is so cool!! I have no painting skills but I think I might try this anyway! I even like how it looks without the paint! Thanks so much for sharing! Pinning it!!
ReplyDeleteI love this, especially the bird and branch stencil. Can you tell me where to get it? Thank you for sharing this wonderful process!
ReplyDeleteThank you Sherry! I think the stencil came from Hobby Lobby...I recently bought a few more at Michaels and they had a good selection also.
DeleteYou know, if you are handy with pencil and craft knife you can easily make your own stencil...usually craft stores have the plain stencil material that you can cut...lol, but precut is just so easy!
thanks for sharing! love the step-by-step video! I will definitively give it a try! :)
ReplyDeletethanks for sharing! I love the step-by-step process. I will definitively give it a try!
ReplyDeleteI love this! So pretty! Thanks for linking!
ReplyDeleteIsn't modeling paste fun???? This is a great project. Thank you for taking the time to share!
ReplyDeleteIsn't modeling paste fun to work with???? This is a great project. Thank you for sharing it!
ReplyDeletewww.bunnyhamm.weebly.com
Thank you so much for this tutorial! I am definitely going to give this a try, except I'll do it on furniture. I hope the paste works on furniture...
ReplyDelete